Note
Go to the end to download the full example code.
Quick Start
This example is the recommended starting point for a new user. It walks through a typical LAION-fMRI workflow end-to-end and introduces the four steps that any later analysis builds on.
The plan is:
Initialize a local data directory so the package knows where to keep the data.
Query the dataset to get a feel for what is available before anything is downloaded.
Download one subject so the rest of the example has something concrete to work with.
Load the data and visualize a few representative outputs.
The focused examples on initialization, querying, and loading then dive deeper into each of those steps; the goal here is to give a complete overview first so the rest of the gallery has context.
Initialize the data directory
Before anything can be downloaded, the package needs to know
where the data should live on disk. dataset_initialize
writes a small configuration so the location persists across
Python sessions, so once it has been set, the same directory
is reused automatically on every subsequent call.
This example, together with the initialization, querying, and loading examples, all share the same directory. That way the licenses accepted here and the data downloaded below carry over, so nothing is re-prompted and nothing is re-downloaded when the other examples run. Full first-time-setup details (including the license acceptance flow) are covered in Dataset Initialization.
import os

from laion_fmri.config import dataset_initialize, get_data_dir

# define and initialize the data directory
data_dir = os.environ.get(
    "LAION_FMRI_EXAMPLE_DATA_DIR",
    os.path.join(os.getcwd(), "laion_fmri_quickstart"),
)
os.makedirs(data_dir, exist_ok=True)
dataset_initialize(data_dir)
print(f"Data directory: {get_data_dir()}")
Data directory: /path/to/laion-fmri-data
Query the dataset
Before downloading anything it is useful to get a feel for what is actually in the dataset, how many subjects there are, which ROIs ship per subject, and so on. The bucket is public, so no AWS credentials are required; discovery functions read directly from S3 and report what is available without pulling any subject data to disk.
Two helpers cover the most common questions:
get_subjects() returns the list of subject IDs the bucket
exposes, and describe() prints a one-screen overview
(bucket name, subject count, and the first subject’s ROI
list). They are convenient sanity checks at the start of any
session because they confirm that the bucket is reachable
from the current network. The full discovery API (subjects,
ROIs, splits, OOD partitions, bucket inspection) is covered
in Querying the Dataset.
from laion_fmri.discovery import describe, get_subjects

# list available subjects and print a one-screen overview
print(f"Available subjects: {get_subjects()}")
describe()
Available subjects: ['sub-01', 'sub-03', 'sub-05', 'sub-06', 'sub-07']
LAION-fMRI Dataset
  Bucket:    s3://laion-fmri
  Subjects:  5 (sub-01, sub-03, sub-05, sub-06, sub-07)
  ROIs:      EBA, FBA, FFA1, FFA2, IPCS, IPS0, LO1, LO2, MPA, MST, MT, OFA, OPA, PPA, SPCS, TO1, TO2, V1d, V1v, V2d, V2v, V3A, V3B, V3d, V3v, VO1, VO2, VWFA1, VWFA2, hV4, laionEVC, laiondorsal, laiongeneral, laionlateral, laionventral, lobjects, mfswords, pSTSfaces, pSTSwords, vobjects
Download one subject, but just one session, in parallel
A full subject’s data takes up several tens of gigabytes, so
in most workflows only a slice of it is actually needed at a
time. download is designed for this case. It accepts BIDS
entities (ses, task, space, desc, stat,
suffix, extension) as filters, and only the matching
files are pulled from the bucket. The call below uses this
to grab one session of one subject, which is enough for
everything else in this example to run.
A small detail about ses deserves a closer look. When it
is set to a session ID, only that session’s files come down;
subject-level aggregate maps (per-subject noise-ceiling
variants, mean-R^2 summaries, …) are excluded. To pull
only those aggregates, the special value ses="averages"
is used; combining the two in a list pulls both. The brain
mask is the one automatic exception, since it travels along
with any ses filter because the loader needs it to mask
voxels downstream.
Two other useful flags: n_jobs runs that many parallel
aws s3 cp workers, and the call itself is idempotent, so
re-running after an interrupted transfer skips files that
already match the bucket size, and only the missing files
are fetched.
A short note on licenses. The neuroimaging data and the
stimuli are covered by two separate agreements, so on the
first download the prompt appears twice and I AGREE
has to be typed each time:
Neuroimaging data (CC0 1.0): unrestricted use.
Stimuli (closed, research-only): no redistribution, no commercial or AI/ML-training use.
The acceptances are persisted, so the prompts only appear on the first download into a given data directory. Once accepted, they do not block any subsequent calls. The full set of brain-mask, ROI, and noise-ceiling kwargs plus surface ROI loading is covered in Loading Data.
from laion_fmri.download import download

# pick a single subject and session
subject_id = "sub-01"
session_id = "ses-01"
print(f"Downloading {subject_id} / {session_id}")

# Most workflows only need the files the loaders read directly
# (trial info, statmaps, and ROI masks). The suffix subset
# below keeps a session pull around a few hundred MB instead of
# the multi-GB pulled when everything is requested; drop
# ``suffix`` to also get the raw GLMsingle model dump or the
# JSON sidecars. ``include_anatomical=True`` brings in the
# anatomical T1w used as the backdrop for the visualizations
# below; ``include_freesurfer=True`` pulls the per-subject
# FreeSurfer recon needed by surface / template projections.
download(
    subject=subject_id,
    ses=session_id,
    suffix=["statmap", "trials", "mask"],
    include_stimuli=True,
    include_freesurfer=True,
    include_anatomical=True,
    n_jobs=4,
)
Downloading sub-01 / ses-01
[laion-fmri] stimuli already up to date.
Load the subject
With the data on disk, the next step is to wrap it in a
Subject. The wrapper exposes
all the per-subject accessors (sessions, ROIs, betas,
noise ceilings, and so on) through one object, so the rest
of the example does not have to know anything about the
underlying file layout.
A short note on the brain mask: by default it is the
anatomically-derived mask shipped under
derivatives/anatomical/. This is the broader of the two
masks available (every brain voxel, regardless of whether
GLMsingle produced a fit there). To switch to the
functional, mean-R^2-derived mask instead, pass
source="rsquare"; this restricts the voxel axis to the
voxels that actually have a non-zero GLMsingle fit. The
print below reports both counts so the difference can be
seen at a glance. The full cascading-kwarg story is in
Loading Data.
from laion_fmri.subject import load_subject

# load and inspect the subject
sub = load_subject(subject_id)
print(f"Subject:   {sub.subject_id}")
print(f"Sessions:  {sub.get_sessions()}")
print(
    f"Voxels:    {sub.get_n_voxels()} "
    f"(rsquare: {sub.get_n_voxels(source='rsquare')})"
)
print(f"ROIs:      {sub.get_available_rois()}")
Subject:   sub-01
Sessions:  ['ses-01']
Voxels:    272080 (rsquare: 271557)
ROIs:      ['EBA', 'FBA', 'FFA1', 'FFA2', 'IPCS', 'IPS0', 'LO1', 'LO2', 'MPA', 'MST', 'MT', 'OFA', 'OPA', 'PPA', 'SPCS', 'TO1', 'TO2', 'V1d', 'V1v', 'V2d', 'V2v', 'V3A', 'V3B', 'V3d', 'V3v', 'VO1', 'VO2', 'VWFA1', 'VWFA2', 'hV4', 'laionEVC', 'laiondorsal', 'laiongeneral', 'laionlateral', 'laionventral', 'lobjects', 'mfswords', 'pSTSfaces', 'pSTSwords', 'vobjects']
Single-trial betas
Single-trial betas are the main per-stimulus signal the
dataset exposes. They are GLMsingle estimates (one beta per
trial per voxel) and the loader returns them as a
(n_trials, n_voxels) array within whichever brain mask
was chosen above.
A short word of caution about memory: for real subjects the
brain-mask voxel count is around 270k, multiplied by roughly
1000 trials per session that is ~1 GB per call. In practice
an roi= filter should almost always be passed to keep
the array small; restricting to the face-area ROI (a few
hundred voxels) drops the call to a few megabytes, which is
what most downstream analyses actually need.
Two calls are shown below: one over the full brain mask with
streaming=True so peak memory stays around 50 MB, and
one restricted to the face ROIs. The second pattern is the
one to reach for in real workflows.
session = "ses-01"

# without ROI: heavier, so ``streaming=True`` keeps peak memory
# at ~50 MB instead of materializing the full 4-D file
betas_all = sub.get_betas(session=session, streaming=True)
print(f"{session} betas (full mask): {betas_all.shape}")

# recommended: use an ROI filter. ``streaming=True`` keeps peak
# memory low even when an ROI is set, since the underlying
# nii.gz would otherwise be materialized in full before masking
rois_face = sub.get_available_rois(category="face")
if rois_face:
    betas_face = sub.get_betas(
        session=session, roi="face", streaming=True,
    )
    print(f"{session} betas (face ROIs): {betas_face.shape}")
ses-01 betas (full mask): (1044, 272080)
ses-01 betas (face ROIs): (1044, 1100)
Save a derived map back to NIfTI
Once a per-voxel statistic has been computed in brain-mask
space, it usually needs to leave the Python process so
external tools (fslview, nilearn, mricron, …)
can pick it up. Subject.to_nifti is the round-trip helper
for this case. It scatters a 1-D (n_voxels,) array into a
3-D (X, Y, Z) volume on the subject’s image grid, with
zeros outside the brain mask, and writes the result to disk.
As an example, the next few lines average across trials and save the resulting voxel-mean map. Any other per-voxel summary (decoding accuracy, model R^2, contrast estimates) can be saved the same way.
# pick a scratch directory under the shared data dir for any
# derivative NIfTIs this example writes; the path is
# auto-sanitized in the rendered gallery
import pathlib

scratch_dir = pathlib.Path(data_dir) / "tmp"
scratch_dir.mkdir(exist_ok=True)

# compute the trial mean and save it as a 3-D NIfTI
mean_betas = betas_all.mean(axis=0)  # (n_voxels,)
mean_path = str(
    scratch_dir / f"{subject_id}_{session}_trial_mean.nii.gz"
)
sub.to_nifti(mean_betas, mean_path)
print(f"Saved {mean_path}")
Saved /path/to/laion-fmri-data/tmp/sub-01_ses-01_trial_mean.nii.gz
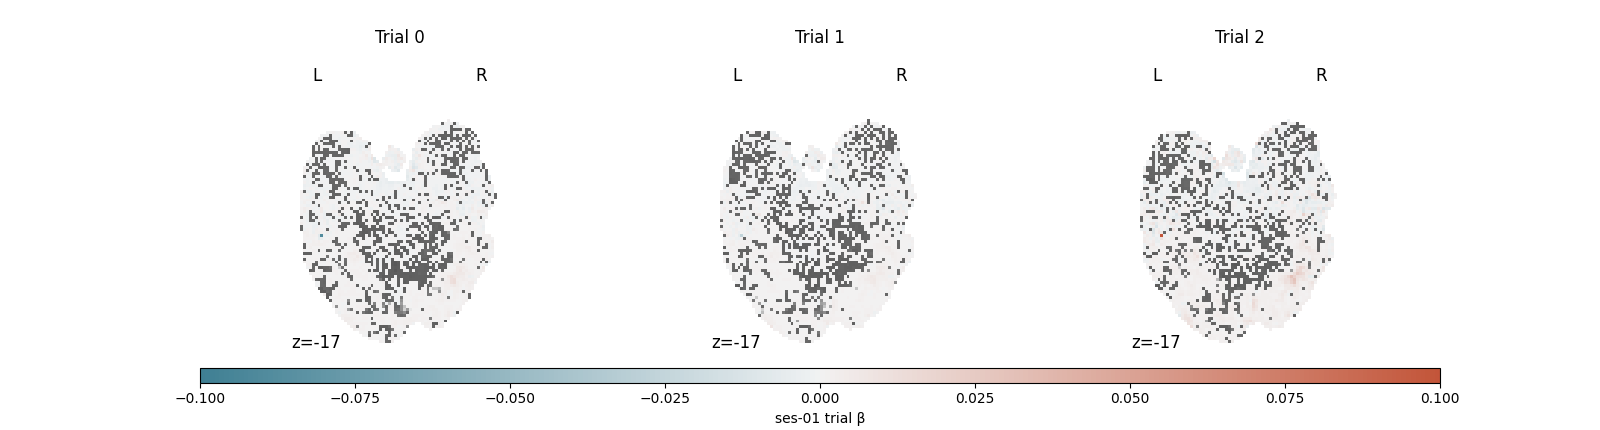
Visualize the first three trials
A quick look at the first three single-trial betas helps verify that the loader is doing what it should before any downstream analysis depends on it.
Single-trial betas are inherently noisier than the block-averaged contrast maps that many users are used to: each panel below captures one stimulus presentation rather than an average over many, so crisp activation patterns should not be expected. The view is most useful as a sanity check on three points: amplitudes in a reasonable range, signal concentrated in cortex rather than at the edges or in white matter, and the three trials looking distinct from each other rather than suspiciously similar.
import warnings

import numpy as np
import matplotlib.pyplot as plt
import seaborn as sns
from matplotlib.colors import Normalize
from nilearn import plotting

# Nilearn warns about NaN / inf voxels from GLMsingle non-fits;
# they're outside the brain mask and don't affect the rendering.
warnings.filterwarnings(
    "ignore",
    message="Non-finite values detected",
    category=UserWarning,
)

# define the anatomical backdrop and the diverging colormap for
# the signed trial betas
bg_img = str(sub.get_t1w())
stat_cmap = sns.diverging_palette(220, 20, as_cmap=True)

# scatter the first three trials back to 3-D NIfTI on disk so
# nilearn can render them
trial_paths = []
for i in range(3):
    p = str(scratch_dir / f"{subject_id}_{session}_trial{i}.nii.gz")
    sub.to_nifti(betas_all[i], p)
    trial_paths.append(p)

# pick a symmetric vmax from the 99th percentile of |β| so the
# diverging colormap stays balanced across all three panels
vmax = float(np.nanpercentile(np.abs(betas_all[:3]), 99))

# set up the figure
fig = plt.figure(figsize=(16, 4.3))
gs = fig.add_gridspec(2, 1, height_ratios=[1, 0.05], hspace=0.1)
strip_gs = gs[0].subgridspec(1, 3, wspace=0.05)
axes = [fig.add_subplot(strip_gs[0, i]) for i in range(3)]
cbar_ax = fig.add_subplot(gs[1])

# plot one cut per trial
for i, ax in enumerate(axes):
    plotting.plot_stat_map(
        trial_paths[i], bg_img=bg_img, axes=ax,
        display_mode="z", cut_coords=[-17],
        cmap=stat_cmap, vmax=vmax, colorbar=False,
        black_bg=False, threshold=0.5,
    )
    ax.set_title(f"Trial {i}")

# define and render the colorbar
sm = plt.cm.ScalarMappable(
    cmap=stat_cmap, norm=Normalize(vmin=-vmax, vmax=vmax),
)
fig.colorbar(
    sm, cax=cbar_ax, orientation="horizontal",
    label=f"{session} trial β (% signal change)",
)
plt.show()
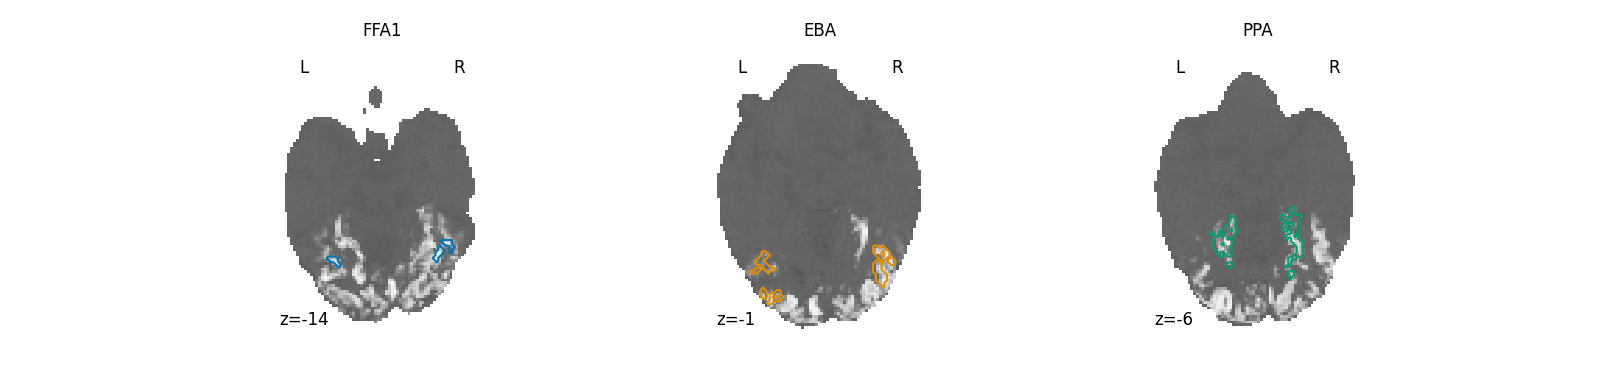
Three category-selective ROIs
Category-selective ROIs are the most common entry point for voxel-axis selection on this dataset, so it is worth checking them visually before they are used to filter any subsequent analysis.
Face, body, and place ROIs sit in fairly stereotyped parts
of ventral temporal cortex, but each subject’s exact
localization differs. A glance at the panel below confirms
the masks landed where they should, FFA1 in fusiform
gyrus, EBA in lateral occipitotemporal cortex, PPA in
parahippocampal cortex. If something looks wrong here, it is
the right moment to find out, before the masks are passed
into a downstream model. The multi-format ROI accessor
(volume .nii.gz / surface .func.gii / FreeSurfer
.label) is covered in Loading Data.
import nibabel as nib
from nilearn.plotting import find_xyz_cut_coords

# pair each ROI with a colorblind-safe contour color
palette = sns.color_palette("colorblind")
roi_specs = [
    ("FFA1", palette[0]),
    ("EBA",  palette[1]),
    ("PPA",  palette[2]),
]

# set up the figure
fig, axes = plt.subplots(1, 3, figsize=(16, 3.7))

# loop over ROIs and draw each contour on its own anatomical cut
for ax, (roi, color) in zip(axes, roi_specs):
    # scatter the ROI mask to NIfTI so nilearn can read it
    roi_path = str(scratch_dir / f"{subject_id}_roi_{roi}.nii.gz")
    sub.to_nifti(
        sub.get_roi_mask(roi).astype("float32"), roi_path,
    )
    # pick the axial slice centered on the ROI's bounding box
    _, _, z = find_xyz_cut_coords(nib.load(roi_path))
    # plot the anatomical backdrop, then overlay the ROI contour
    display = plotting.plot_anat(
        bg_img, axes=ax,
        display_mode="z", cut_coords=[z],
        black_bg=False, threshold=0.1, colorbar=False,
    )
    display.add_contours(
        roi_path, levels=[0.5],
        colors=[color], linewidths=1.5,
    )
    ax.set_title(roi)
plt.show()
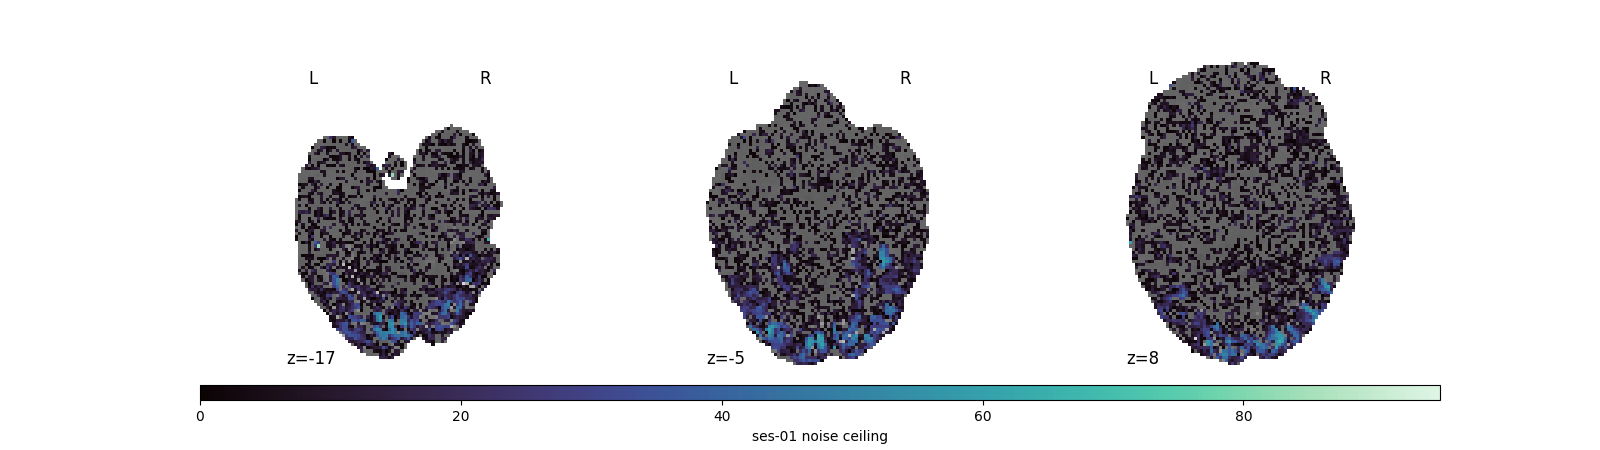
Per-session noise ceiling
Before any decoding, encoding, or RSA work, it is useful to know which voxels are actually worth modeling. The noise-ceiling map answers exactly that question. It estimates how much of each voxel’s variance the stimulus could possibly explain, given the trial-to-trial reliability of the responses. Voxels with a low ceiling will not produce good models no matter how clever the analysis is.
NC: shape=(272080,), range=[0.000, 95.076]
Visualize the noise-ceiling map
A picture of the noise-ceiling distribution on the brain makes the same point concrete. High values mark voxels where repeated presentations produce consistent responses, low values mark noise. Looking at this spatial pattern usually informs the next step in an analysis: thresholding by NC, restricting to high-NC voxels, or staying with ROI-based selections.
# define the sequential colormap for the non-negative NC values
mako_cmap = sns.color_palette("mako", as_cmap=True)

# scatter the NC map back to NIfTI for nilearn to render
nc_path = str(scratch_dir / f"{subject_id}_{session}_nc.nii.gz")
sub.to_nifti(nc, nc_path)

# define the data range and the axial cuts to plot
nc_vmax = float(nc.max())
cuts = [-17, -5, 8]

# set up the figure
fig = plt.figure(figsize=(16, 4.5))
gs = fig.add_gridspec(2, 1, height_ratios=[1, 0.05], hspace=0.1)
strip_gs = gs[0].subgridspec(1, 3, wspace=0.05)
axes = [fig.add_subplot(strip_gs[0, i]) for i in range(3)]
cbar_ax = fig.add_subplot(gs[1])

# plot the different cuts
for ax, z in zip(axes, cuts):
    plotting.plot_stat_map(
        nc_path, bg_img=bg_img, axes=ax,
        display_mode="z", cut_coords=[z],
        cmap=mako_cmap, vmax=nc_vmax, colorbar=False,
        black_bg=False, threshold=0.1,
    )

# define and render the colorbar
sm = plt.cm.ScalarMappable(
    cmap=mako_cmap, norm=Normalize(vmin=0, vmax=nc_vmax),
)
fig.colorbar(
    sm, cax=cbar_ax, orientation="horizontal",
    label=f"{session} noise ceiling (% var. expl.)",
)
plt.show()
Stimulus images
Every beta in the array above corresponds to one image the
subject saw. For any analysis that relates brain responses to
what was shown (decoding, encoding, RSA against visual
features), the stimulus needs to be retrievable alongside
the beta. include_stimuli=True on the download above
already pulled the images, and sub.images is the accessor
that keeps them aligned with the betas. Indexing it with the
global trial index (0 .. n_total_trials-1, matching the
rows of sub.metadata) returns the PIL.Image shown
during that trial.
The matplotlib render is kept commented so the gallery does not redistribute stimulus content; uncomment it to inspect the image locally. For object-level segmentation masks that go with each image, see Object Segmentations.
# fetch and print the first trial's stimulus image
img = sub.images.get(0)
print(f"First trial image: {img.size}")

# uncomment to render the first trial's stimulus image locally:
# fig, ax = plt.subplots(figsize=(4, 4))
# ax.imshow(img)
# ax.set_title("First trial stimulus")
# ax.axis("off")
# plt.show()
First trial image: (1000, 1000)
Total running time of the script: (2 minutes 17.833 seconds)